
Do you want to extend your outdoor living space and make it more visually appealing? Installing pavers is a hardscape project that can turn your simple backyard into a patio retreat. Aside from patios, pavers can also be used to build driveways, walkways, and other yard features. With these blocks, you can have a level place for your outdoor furniture, grills, vehicles, or feet to walk on.
If you take a look at paver patios, it looks like a simple project. But there’s so much you need to know - from the patterns to staining the pavers. Some homeowners turn to professionals to get the job done, but this landscaping improvement project can also be DIY-ed. If you want to learn how to install paver patios, here is a series of how-to videos to guide you.
How to Set Paver Stones
After deciding on which part of your outdoor area to pave, the next step is determining the pattern. There are different paver patterns you can do for patios, which could also work for walkways or driveways.
Here are some of the most common ones plus a video to show you how to set them:
Stretcher
This pattern is recommended for patio areas as well as curved pathways.
Herringbone
Herringbone has a strong interlocking design for those who want a sturdy paver patio. This design is also suitable for driveways.
Basketweave
This one is a beautiful design that is suitable for yards but not for driveways since it doesn’t interlock like herringbone.
Basketweave with Header
This is similar to the basketweave pattern but the edges have a stacked bond pattern.
How to Cut Paver Stones
There are times that you will need to cut a stone paver, depending on the pattern, shape, or design of your patio. Most of the time, you will need to cut a paver in half. The video above will show you how to cut stone or brick pavers with a portable angle grinder.
If you don’t have a handheld grinder yet, here are some of the best ones on the market.

Black+Decker Angle Grinder Tool
4-1/2"
6 Amp Motor
Comes with spindle lock for easy and quick accessory changes

Bosch Angle Grinder
4-1/2"
6 Amp Motor
Comes with 2 position side auxiliary handle
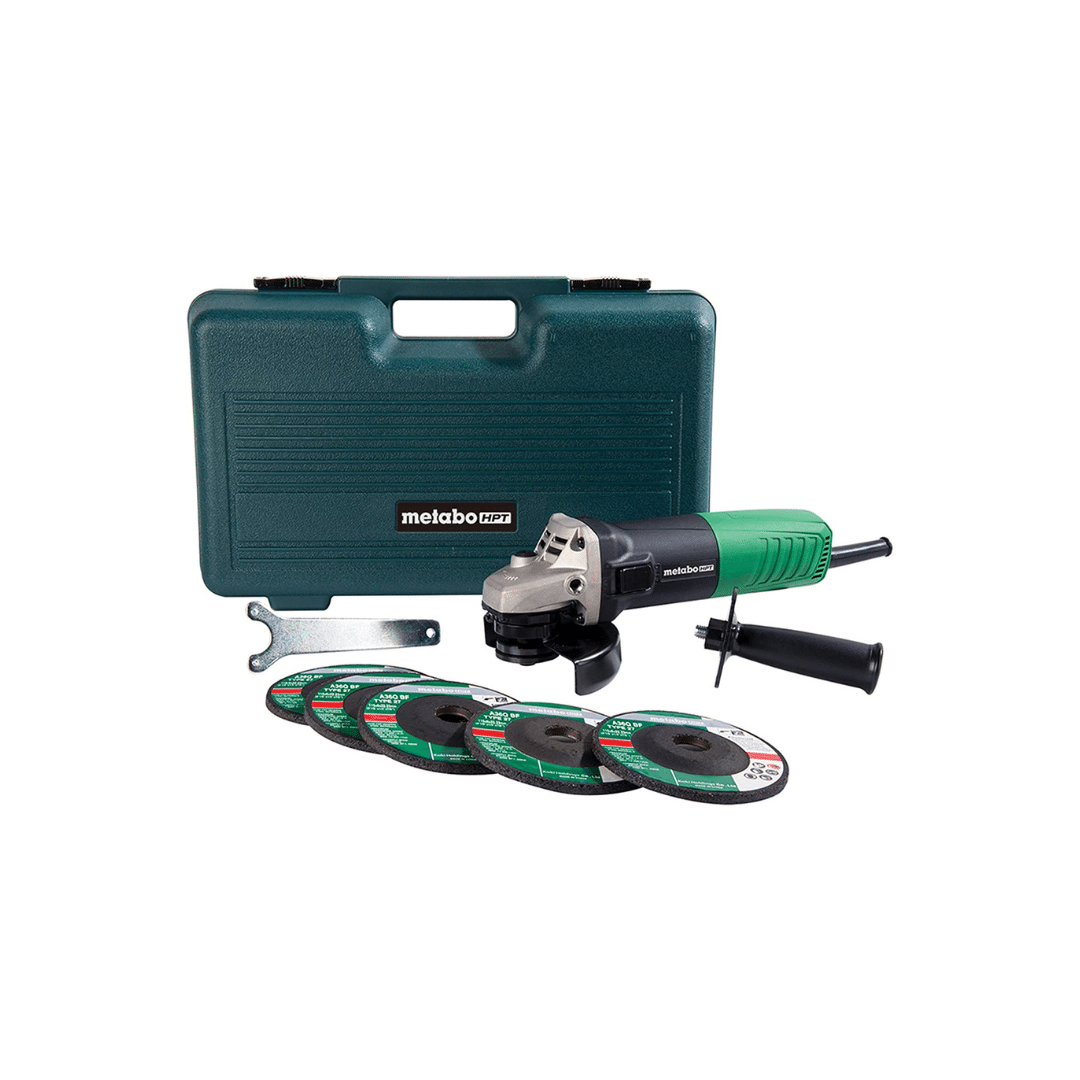
Metabo HPT Angle Grinder
4-1/2"
6 Amp Motor
Comes with 5 Grinding Wheels & Hard Case
How to Cut a Paver Without a Saw
If you don’t have a saw but are in a rush to cut a stone or brick paver, you can still cut it - well, in half. The title mentions splitting it by hand, but it’s not literally just breaking a paver in half with just your bare hands. You will still need tools, which are a 4-inch chisel and a hammer.
You will also need a tape measure or a pencil to mark the pavers. If you don’t have a tape measure, you can just use another similar-sized paver to mark the center of the block that you will cut. Check out the video on how to use the chisel and hammer to split a paver block in half.
How to Build a Paver Patio
Learn how to make a paver or natural stone patio with this video by Quikrete. But first, here are the materials and tools you will need:
Materials | Tools |
|---|---|
Strings, stakes or batter boards | Shovel |
Mark the project area layout
Mark the layout or outside dimensions of the project area using the strings and stakes or batter boards.
Remove the sod and dirt
Dig out the layout to a depth of 4 to 7 inches using the shovel. Adjust the depth based on the height of your pavers, which should be at ground level.
Install edge restraints
Lay edge restraints or use a low line to keep the blocks straight. These will help stabilize the pavers and prevent shifting and settling. To allow proper drainage, it should slope evenly away from structures, a 1/4 inch for every 12 feet for rain runoff. Use a leveler to check the slope.
Add the gravel paver base
Pour 2 to 4 inches of gravel paver base or compactable underlayment base, which will be used to support the patio. Level it with a gravel rake and then compact it with a tamper.
Spread paver sand
On top of the compacted gravel paver base, pour and spread 1 to 2 inches of paver sand for leveling and used as a bed for the pavers.
Create the screed
Construct a screed using a 2x4 and 1x1. Combine them using nails and a hammer.
Screed the paver sand
Use the screed to smoothen the sand. Remove the excess sand after screeding and spread it. Repeat this until the sand is level and has become a flat surface.
Lay the paver blocks
Place the paver blocks and align them using stakes and a string or a straight edge. Start in one corner and lay the pavers outward with a consistent joint width between each block.
Leveling the paver
Tap the pavers in place with a rubber mallet. Use a leveler to regularly check if the blocks are square and level.
Fill joints with sand
Pour polymeric sand or jointing sand between the joints of the pavers. This will keep the blocks in place and prevent weeds from growing in the spaces between the pavers. Sweep the sand into the joints using a broom or brush and remove excess sand on the paver surface.
The amount of polymeric sand or jointing sand will be based on joint width and paver thickness. In general,
1.5-inch joint = around 5 bags for 100 square feet
2-inch joint = around 13 bags for 100 square feet
Finishing touches
Using a hose with a misting nozzle, spray the paver surface and sand-filled joints with a fine and gentle water mist. Dampen for three more times at hourly intervals after placement, but make sure not to flood the sand on the surface. The sand-filled joints will dry after several days or longer depending on the climate.
If you want to get a professional to install your paver patio, I recommend checking HomeAdvisor. Easily compare quotes from multiple contractors in your area. All contractors are require to be licensed and insured to join this platform.
FIND LOCAL PROS FOR YOUR HOME PROJECT
How to Stain Paver Bricks
Here’s a video on how to stain patio pavers. The materials and tools that you will need are:
Materials | Tools |
|---|---|
Translucent concrete stain | Paintbrush, Roller tray |
Staining the paver stone is similar to how you paint, well, anything. According to the video, you don’t need to use painter’s tape since the stain can seep under the tape, which will color the grout line after you peel it. Instead, glide the paintbrush along the mortar lines, which should not get stained.
How to Level an Existing Paver Patio
If your patio has become uneven or settled, you can still repair it without having to remove all of the blocks. Some areas of a patio paver can sink due to improper drainage or water collection in that spot, which would cause the blocks to settle. To make them level again, you will need these tools and materials:
Materials | Tools |
|---|---|
Crushed limestone | Screwdriver, Leveler |
Before you get started, it is recommended to power wash your patio so that it would look clean and grim-free as well as remove polymer sand between the blocks.
Locate and remove the blocks
Find the blocks that have sunk or become uneven, and use the screwdriver to pop the affected pavers. Whether you have a complicated or simple pattern, arrange the blocks similar to how you found them after lifting them out to make it easier to put back the right paver after.
Do a level check
After lifting out the uneven blocks, take a leveler and check the nearby pavers that are still intact. If the block is off by more than one-eighth to a quarter-inch, remove it and place accordingly with the other extracted pavers.
Pour crushed limestone
Spread the crushed limestone on the areas where you removed the uneven blocks. Use a flat trowel to evenly distribute the material.
Lay the paver stones
Following the same arrangement, place back the paver blocks one by one. Use a rubber hammer to level them. Add more crushed gravel as needed. Be careful when hammering to not damage the blocks.
Fill the joints and check the evenness
Pour polymer sand in between the joints of the pavers. Use the leveler and place it at various angles across the affected area to check if it is level. After setting back all the blocks, this improvement could prevent the patio from sinking again. It won’t wash out as quickly after settling and properly compacting the crushed limestone.